|
|
|
|
|
The "Mike Jeans
Method" (Reproduced with permission from Mike's Web site 2009) SOWING
LAPAGERIA SEED The seed needs to be
reasonably fresh to achieve germination as it can dry out quickly once it has
been removed from its pod, and in a dried out state it has only very low
viability. The seed pods
usually grow to about 1.5" long x 3/4" -1" diameter and
are rock solid. Quite suddenly they will become soft and soggy-at this
point the seeds are ready to sow. There are usually about 100 seed per
pod, I try to keep the seed in its pod until it is sown as that keeps
it viable for considerably longer. Although I do not have any experience of
washing the seed before sowing, I am led to believe that seed that has been
washed and then sown will have a higher germination rate. It is likely that
the pulp surrounding the seeds in the pod could act as a very mild germination
inhibitor. |
|
|
Freshly harvested seed can be
sown in all manner of ways and produce a respectable germination rate. It is
quite possible to get 90% germination from freshly harvested seed. My personal
preference is to sow the seed in the same growing mix that I use for all my
Lapageria plants. That growing
mix consists of 2 parts good quality coarse peat, 1 part medium grade peat and
1 part crushed horticultural crushed and washed grit (6mm and down in size) by
volume. The peat must be a high quality sphagnum
peat. To the mix is added a balanced, long period controlled release
fertiliser which includes all the usual trace elements and a small amount of
horticultural charcoal granules. My seed is sown in a standard sized seed tray with a depth of 7.5cm. (3”). The seed tray is filled with the growing mix up to about 1.2 cm. from the top. The seed is then carefully laid on top of the growing mix and covered with about 6mm. of crushed horticultural grit (5 or 6 mm. size) If the tray is then put
on a heated mist propagation bed, shoots will begin to appear in 4 or 5
weeks. On the other hand, if the seed is left in a cool, shady and frost
free spot outside, it may take 3 months for the first of the shoots to
appear. Some advice suggests soaking the seed in tepid water before
sowing, but I have no experience of this technique or the suggestion
that the seed should be left in the refrigerator for a couple of weeks
first. The more extreme techniques may be essential for seed that is not
as fresh as it might be. The seed tray should never be allowed to dry
and the growing mix should always be moist but never waterlogged. The
peat and coarse grit mix should have excellent drainage whilst the
relatively large sized grit on top should ensure that the seed does not
dry out. The horticultural charcoal is added to the growing mix to make
sure that it does not get sour. As soon as the first shoots appear, they are already at risk from: 1) Greenfly, which can easily swamp them if not spotted. 2) Slugs and snails. A single specimen can easily demolish a whole tray in a night, so a few scattered granules of slug bait are essential. 3) Damping off during the period from late autumn to early spring. A very effective prevention is to spray with Cheshunt Compound every week or two during that time. A small ( 1.25 litre capacity ) pump action pressure spray will deliver a sufficiently fine spray. A small lever operated spray is unlikely to give a fine enough output. 4) Mealy bug can be a serious hazard at any time in the life cycle of the plant. It can be tackled effectively with Talstar or Spraying Oil – the latter is possibly less hazardous to the operator. It is worth remembering that mealy bug breeds in a 2 week life cycle, so that spraying at 2 week intervals offers the best chance of success. Systemic insecticides such as Provado or Intercept are efficient, but are only effective for about 6 weeks and cannot be re-applied for several months. 5) Plants enjoying cool shady conditions outdoors when the weather is frost free can have their leaves turned into an unsightly mess by vine weevil. The roots are too coarse to provide food for the grubs. The adult vine weevils feed at night, and seem to return on subsequent nights to the same leaves to feed. If their typical damage is noticed, usually to new leaves, the adults can be spotted by examining the leaves by torchlight. |
|
|
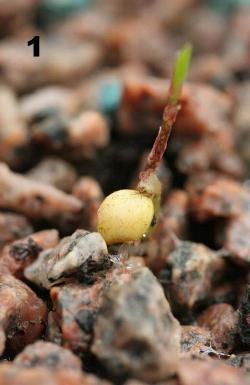
Potting on seems to present some problems. When the seedling is nothing more than a small shoot, a seed and a radicle – as the seedling shown in picture 1 there are more than enough reserves of energy for it to re-establish itself if it is moved, but at that stage it has made so little growth that there is no point in moving it. The size of the young seedling can be judged from the seed which is about 3mm. in diameter. At that stage, a small crown can be seen starting to develop, with the radicle hanging down and the stem coming out of it. As the crown develops the seed becomes exhausted of reserves and parts company with the crown – also note the traces of a slug having been in the vicinity, but preferring to dine on slug bait! After some months, it will have grown into a small plant with one or two stems and some thread like roots. At this stage, the seedling will have relatively little reserves and have difficulty re-establishing itself if it is moved. |
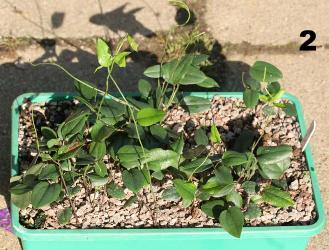
| The tray shown in picture 2 has reached the stage where I would pot the seedlings on in to 9cm. square pots. |
|
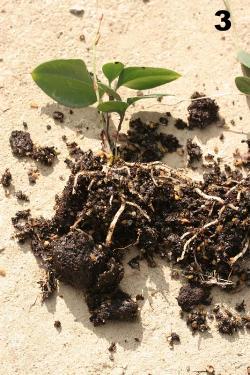
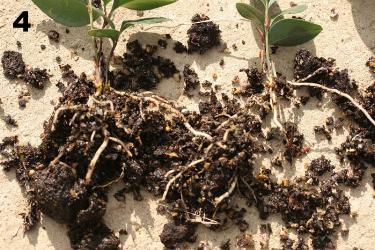
| By this stage, the seedlings have developed one or more fairly thick fleshy white roots and a small crown with 2 or 3 stems. Such seedlings can be seen in pictures 3 and 4 | |
|
|
|
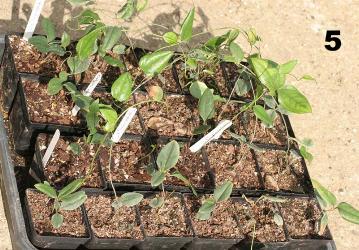
The newly potted seedlings can be seen in their tray LS\(5).JPG.
The square pots are placed in a large tray and sit on capillary matting
cover with a porous black plastic sheet that stops the roots growing
into the matting. The large tray has no drainage holes in the base, but
I drill two or three 8mm. drainage holes at either end, level with the
base so that the pots cannot ever sit in water. The wet matting enables
the roots at the bottom of the pots to soak up some moisture, and the
roots have a habit of building up at the base of the pot. |
| Lapageria comes from sea level forests in Chile and likes cool damp weather. This results in most of the plant’s growth being made in spring and autumn, and consequently the best time to pot the seedlings on is either spring or autumn. The seedlings shown in picture 2 were sown in September and the photograph taken the following September. The following year, I would hope to pot the plants on into 1litre deep pots – by which time the plants are 1½ - 2 years old. And the year after, when the plants are coming up to 3 years old, I would pot them into 15cm. full pots (1.8litre). At that stage, the plants should have some long stems which can be trained up a 1.2m cane. With a bit of luck, some of them will produce one or two flowers in late autumn. The remainder should do so the following year. |
|
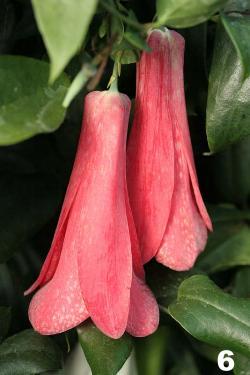
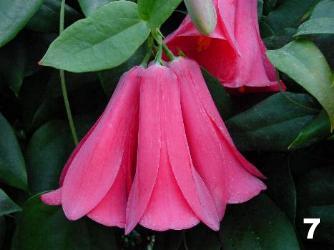
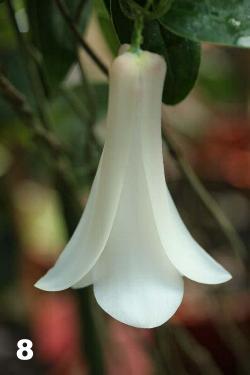
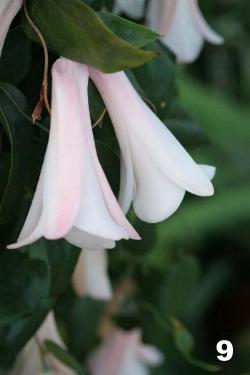
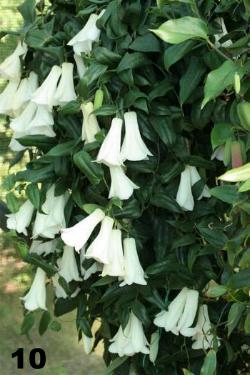
| I am trying to develop two seed sown strains of Lapageria rosea. The basic one that has plenty of large deep rose flowers of good shape and form. I try to avoid flowers where the petals do not turn up at the ends. The second strain is described as “White/pale shades”. Half or more of the plants have pure white flowers and most of the remainder have some pale blush on the outer petals, often only towards the top. The inner petals of those plants often have brilliant white inner petals – brighter white than the pure white flowers. | |
| Typical of the red flowered strain are pictures 6 and 7 | |
|
|
| While the “White /pale shades” can be seen in pictures 8, 9 and 10 |
|
 |
 Mike Jeans Mike Jeans |